
Lemon Matcha Sponge Cake w/ Raspberry Yoghurt Cream Cheese (GF) | Katherine Sabbath

Recipe by Katherine Sabbath for KitchenAid Kyoto Glow
Gluten-Free Lemon & Matcha Sponge Cake
- 160g unsalted butter, softened
- 1 cup (230g) caster sugar (you can also use coconut sugar or maple sugar)
- Zest of 1 medium lemon
- 2 tsp matcha powder (available in health food stores & Asian supermarkets)
- 1 1/2 cups (230g) gluten-free self-raising flour
- 1 teaspoon vanilla extract
- 4 free-range eggs, lightly whisked
- 2 tablespoons hot water
- Preheat the oven to 160°C (320°F) fan forced. Lightly grease 1 x 7 inch round and deep cake tin (the deeper the better, as this cake will rise!) and line the base and side with non-stick baking paper (allowing a 3 inch border higher than cake tin).
- Using the paddle attachment of your KitchenAid mixer, beat the butter, sugar and lemon zest until light, pale and creamy. Add the matcha powder, then gradually add the vanilla and eggs, beating well after each addition.
- Gently fold in the remaining flour and the water, until combined but being careful not to over-mix.
- Pour into prepared cake tin. Bake for 40-45 minutes or until the centre of the cake springs back when lightly pressed, or when a wooden skewer inserted into the centre comes out clean. Leave the cake in the tin for 15-20 minutes before transferring to a wire rack to cool completely. TIP: I cool my sponge cakes upside down to create a flat top that doesn’t need trimming. Cover and set aside until needed.
Raspberry Yoghurt Cream Cheese
- 500g cream cheese, softened
- 3 tbsp thick greek yoghurt
- 1 tsp vanilla bean paste
- 1 cup (135g) icing sugar mixture, sifted (you can find low sugar and low GI versions in supermarkets and health food stores)
- 40g freeze dried raspberry powder (available in health food stores and online)
- Natural pink food colouring, optional
Using the paddle attachment of your KitchenAid mixer, beat the cream cheese, yoghurt, and vanilla until light and fluffy. Add the icing sugar and gently beat until incorporated. Add the raspberry powder and beat until fluffy. If using natural pink colouring, tint until and a desired colour is achieved. If needed, chill in refrigerator for 15 minutes until thickened and more workable for piping in between cake layers.
Assembly & Decoration
- 1/2 cup lemon curd (homemade is always best but you can find top quality brands in stores! Whatever makes you happy)
- 1 x large piping bag lined with a 2cm round circular nozzle (you can find reusable and/or biodegradable piping bags in cake decorating supplies stores).
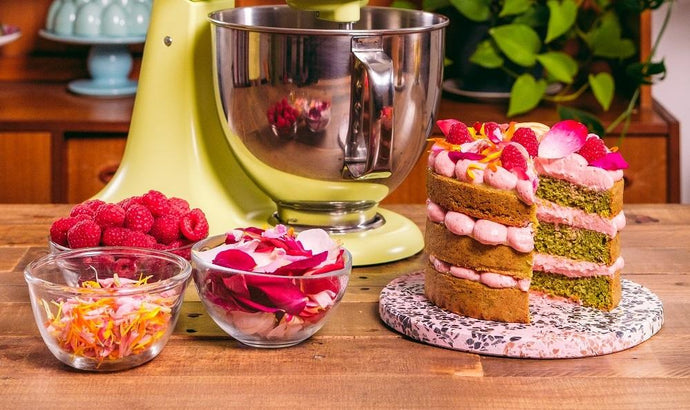
- Handful of fresh raspberries
- Handful edible flowers (available from speciality grocers, Harris Farm, and online)
- 1 x lemon slice cut into quarters
- Using a long, thin knife, carefully divide your cake into three even layers. Working on a cake turntable or lazy Susan, secure the bottom layer of cake onto a cake board or plate with a dollop of raspberry yoghurt cream cheese and then gently twist in place.
- Use a small offset spatula or butter knife to spread a thin layer of lemon curd right to the outer edge of cake. Fill piping bag with cream cheese filling and working from the outside in, pipe dollops onto cake. TIP: If needed, chill in the refrigerator for 10-15 minutes to allow cream cheese filling to firm before adding next layer.
- Place the second layer of cake on top and gently press down to secure. Repeat with lemon curd and cream cheese filling, and chill again if needed.
- Place the third and final layer of cake on top and gently press down to secure. Repeat with lemon curd and cream cheese filling.
- Using the picture as a guide, artfully decorate your cake with raspberries, edible flowers, and fresh lemon segments. ENJOY!
Decorating Tips
- When adding icing sugar to make cream cheese filling, I turn off the KitchenAid mixer to add the icing sugar and then slowly turn it back up to full speed to incorporate it.
- No time to pipe? No worries! Feel free to dollop with a spoon or spread the cream cheese filling straight onto your cake layers.
Storage: This cake can be refrigerated for up to 3 days. It is best served at room temperature and enjoyed with loved ones.
Tags: Recipes , Dessert, Gluten-Free
Tools: Stand Mixers


